CDN is abbreviation for Content Delivery Network. Hard to believe that like 5 years ago it sounded like a rocket science in WWW. Only huge sites were able to afford it and configure it right. Now things have completely changed and today's question is: Why you still do not use CDN for your site or blog?
Because of the W3 Total Cache plugin, setting up a CDN for Wordpress based site is criminally simple. Thats another one cent in my love Wordpress topic. If your website receives more than a few hundred visitors a month, or if your site makes visitors download a lot of data (images, self-hosted javascripts, flash files, etc.), this is a great setup.
There’s also an SEO benefit in using a CDN…at least indirectly. Faster sites get more traffic from Google and Bing than slower sites. By making your site faster, you increase the likelihood Google will refer people to your site. Lets get from the start...
# What is CDN?
A content delivery network (CDN) is a large distributed system of servers deployed in multiple data centers in the Internet. The goal of a CDN is to serve content to end-users with high availability and high performance. By content I mean static content that does not change frequently in time, like Images, CSS, JavaScript, Videos, Flash, etc...
# How CDN works?
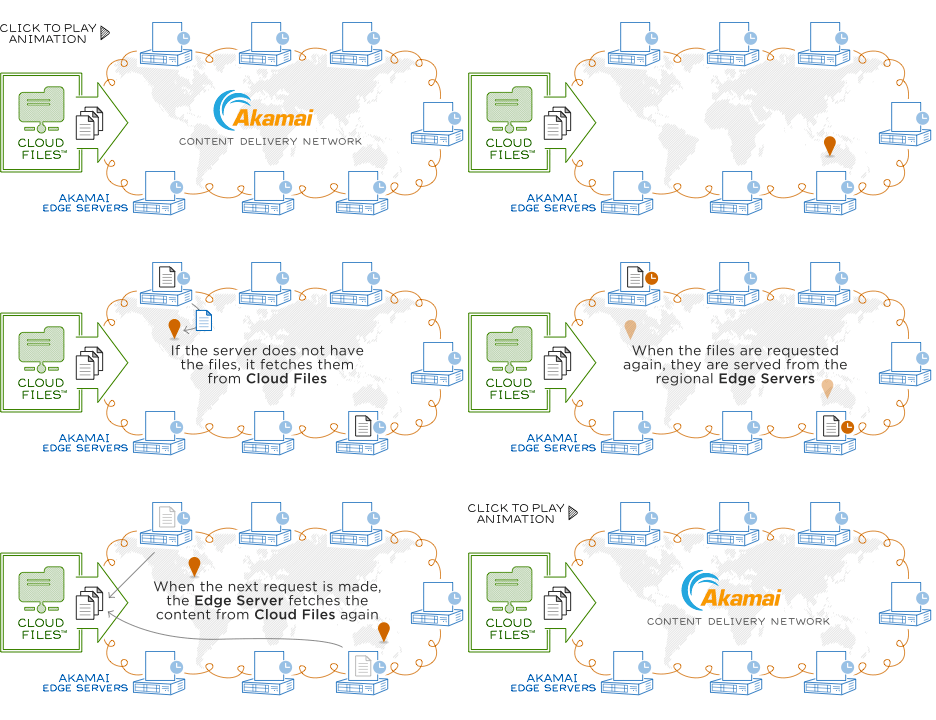
Picture below, borrowed from Rackspace is pretty self-explaining. Your task in this scheme is to put your content(static files) somewhere using FTP or API and all the rest is handled by CDN provider
#  Why to bother with CDN?
Amazon makes is really clear why a fast loading website is important: Every 100ms of load time improvement increases the revenue with 1%. Most of the loading time of your website involves waiting for the files to download. If you use a CDN, these files will always be located on the server nearest to your visitor. Your visitor will experience very limited latency in the network, meaning the files will be loaded by the speed of light.
As I mentioned before it is criminally simple to setup and it gives you following advantages:
- Offload your server(s) of serving static files
- Out of the box scalability
- Speedup page loading due to close location to the user
- Good for SEO
Below you can find price comparison table.
Providers | Bandwidth pricing | Storage pricing ▼ | Network |
|---|---|---|---|
Amazon AWS S3 with Cloudfront | Monthly: 30 cent per GB (= 1 TB for $300 | Monthly: 1 GB for $0,093 | Self-owned |
Rackspace Cloud Files | Monthly: 18 cent per GB (= 1 TB for $180) | Monthly: 1 GB for $0,15 | Self-owned + Packet Exchange |
VPS.net CDN | One-time: 1 TB (1.000 GB!) for $34.95 | Monthly: 10 GB for $20 (see detailed info) | Level3 |
MaxCDN | One-time: 1 TB (1.000 GB!) for $39.95 | Monthly: 10 GB for $9,95 |
# How to setup CDN with Wordpress
What I really like about Wordpress that it has plugins for almost all imanaginable tasks. So in this case all dirty side is covered by installing W3 Total Cache plugin. Below there are clear steps to setup:
Step-1: Configure Rackspace & DNS
Create new container in Cloud Files control panel. Make this container public. Click "View all links" to see address assigned to this container, something like this:http://e6fd304293b7399f9ca1-2a1be03daaeec33e10df23a291f0252a.r34.cf2.rackcdn.com
You can use it as it is, but I prefer more readable names. For this modify your site DNS zone and add CNAME like this:
cdn.yoursite.com CNAME e6fd304293b7399f9ca1-2a252a.r34.cf2.rackcdn.com
Step-2: Configure Wordpress
Download, install and active W3 Total Cache plugin. Installation will require some permission changes on wp-content directory, but its simple.You will notice new top level menu "Performance", all magic happens here.
Step-3: Configure W3 Total Cache
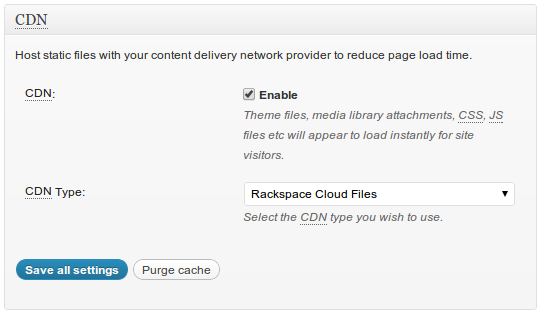
Go Performance->General, enable CDN and select type, which is Rackspace in this case, see below:If you plan to use only CDN for now, disable all other caches type on general tab.
Step-4: Configure CDN Settings
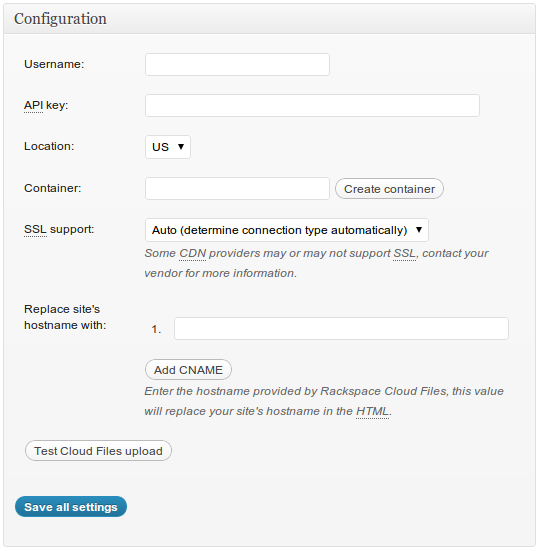
Next open Performance->CDN menu and setup these parameters:Username - Your Rackspace cloud login name
API Key - Rackspace API key, can be obtained in control panel
Container - Name of container you created for CDN files
Hostname - Name registered in DNS, like cdn.sitename.com
See picture below
After "Test Cloud Files upload" gave you success message, you are ready to go to next step.
Step-5: Initial content uploading
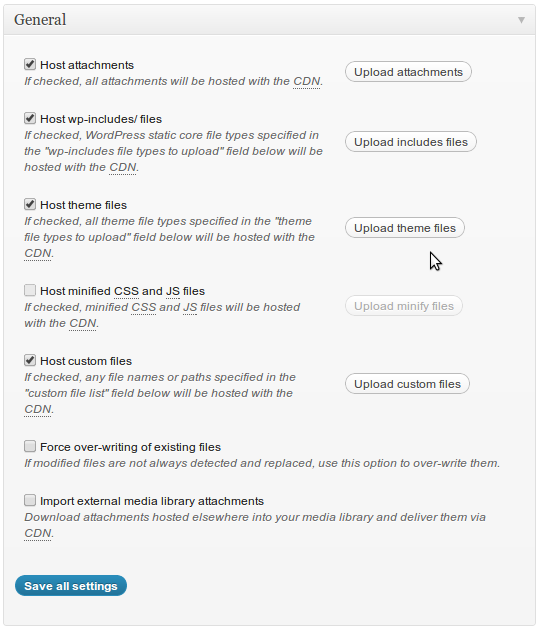
Open Performance->CDN and on the General section click all Upload attachments buttons one by one. In popup window click "Start" and wait till upload finishes.Step-6: Testing setup
On the top of page click Preview button:It will open your site with with ?w3tc_preview=1 parameter, it tells W3 Cache use CDN only for this browser session. Browse your site carefully to confirm it looks okay, no CSS or JS is missing.
Click Deploy and your site is ready to rock!
# Want to join Rackspace cloud?
Did you notice loading speed of this blog? Its because its powered by Cloud Server and Cloud Files(CDN) Rackspace service!
Click banner below to join Rackspace


